Have you wanted to build your own chat agent but thought that the effort was too high? Think again. With the power of GitHub Copilot (and Claude Sonnet 4 in particular as the agent) I was able to make this simple web application that hosts an OpenAI GPT.
A bit of vibe coding :)
Azure AI Foundry makes it so simple to query OpenAI models. Just deploy a model and they provide you an endpoint you can call. It’s that simple.
Building the functionality around it, like file uploads, chat history and so on is the trickier part, but with copilots today it is so much easier.
My next level up on this chat app is to add “Web search” functionality, as the GPT I made this with has training data up until June 2024.
See my GitHub repository and try and make this for yourself. https://github.com/clintgrove/aiagent2
Starting in Azure AI Foundry
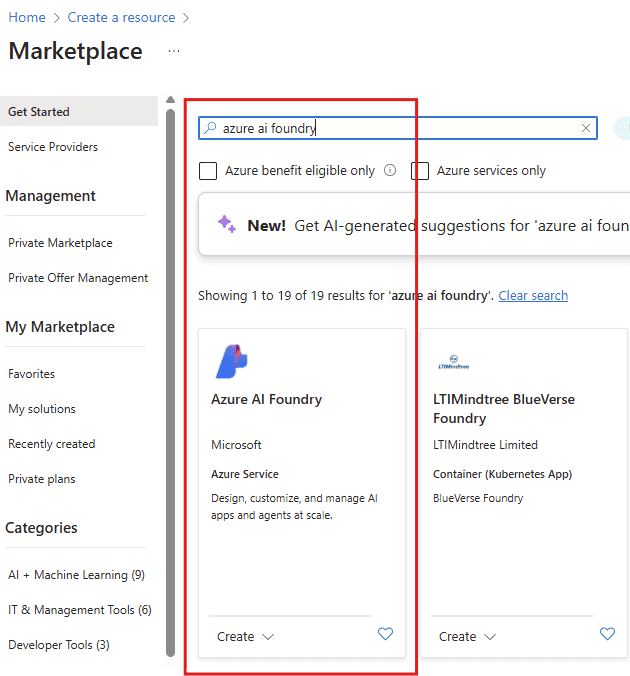
Create your own resource by searching the Azure portal for “Azure AI Foundry”, when it comes up in the search, click on create and go through the steps.
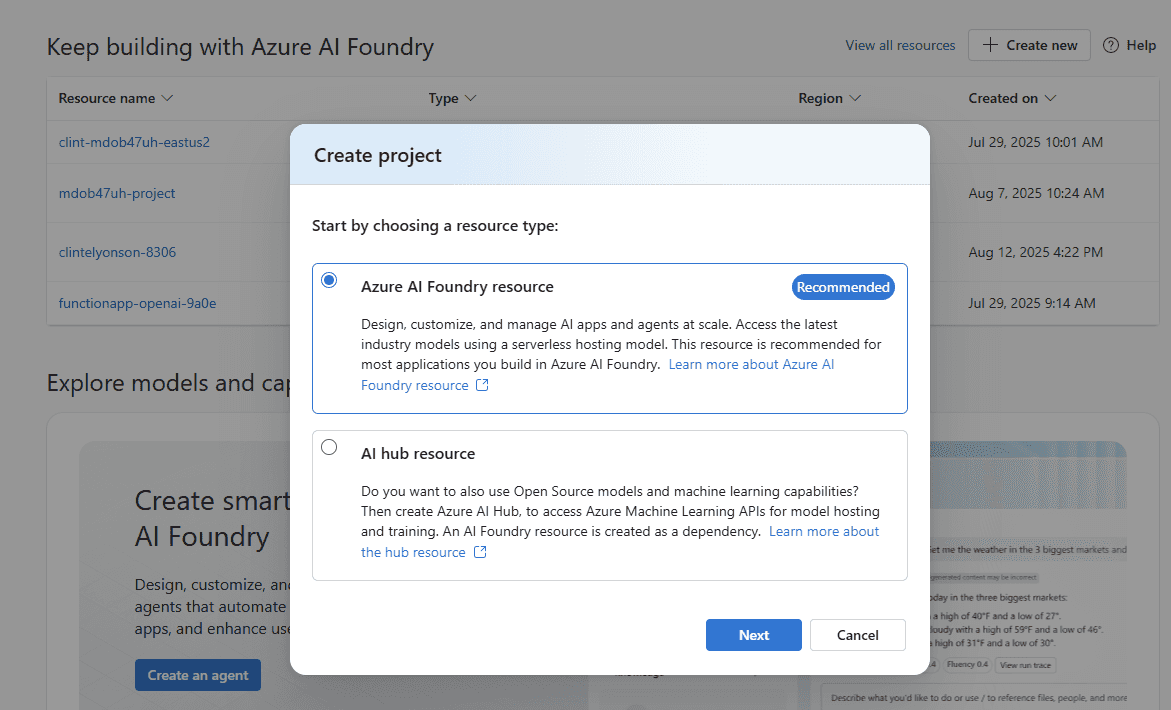
Once you have created the resource then you need to create a resource type within the Foundry, choose “Azure AI Foundry resource”
The next step is to open up the “My assets” window, there you will see any models that you have deployed. As this is your first model deployment, when you open this up, it will open in your default project.
(When you created your Azure AI foundry in the first step, it asked what the name of the default project will be, and this will be the project you are working in.)
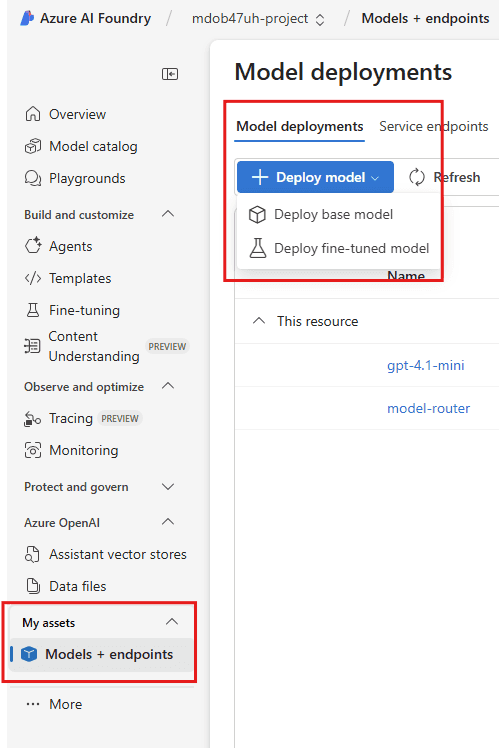
At this point you will have a model that you can now use.
I have deployed a gpt-4.1-mini model and it’s now ready to use.
Azure Static Web App
A very important note: As Azure Static Web Apps have built-in Function abilities you can use them to build API endpoints, however, Static Web Apps are “Global” in location, and you cannot use “DefaultCredentials” to authenticate to the Azure AI endpoint.
Usually we would turn on “managed identity” on the Static Web App and then assign it an RBAC role of Cognitive Services Contributor over the Resource Group that has the Azure AI Foundry inside of it, however because it’s a Global resource it doesn’t work, at least for me it didn’t.
If you wanted to use Azure Static Web Apps and use this way of authenticating then you would have to use Azure Functions as a separate resource to achieve this. See this architecture of that if you would like to try it.
Authentication to Azure AI
I decided to try this using JavaScript. The reason is that I wanted to experiment with this web-based language. I would usually use Python, but as JavaScript has for so long been the de facto web language I thought it might be better.
const { app } = require('@azure/functions');
const { AzureOpenAI } = require("openai");
const { DefaultAzureCredential, getBearerTokenProvider } = require("@azure/identity");
const conversationHistory = new Map();
const endpoint = "https://clint-mdob47uh-eastus2.cognitiveservices.azure.com/";
const modelName = "gpt-4.1-mini";
const deployment = "gpt-4.1-mini";
async function initAzureOpenAI() {
const apiVersion = "2024-04-01-preview";
const apiKey = process.env.AZURE_OPENAI_API_KEY;
if (apiKey) {
console.log('Using API key from environment for Azure OpenAI');
const client = new AzureOpenAI({
endpoint,
apiKey,
deployment,
apiVersion
});
return client;
}
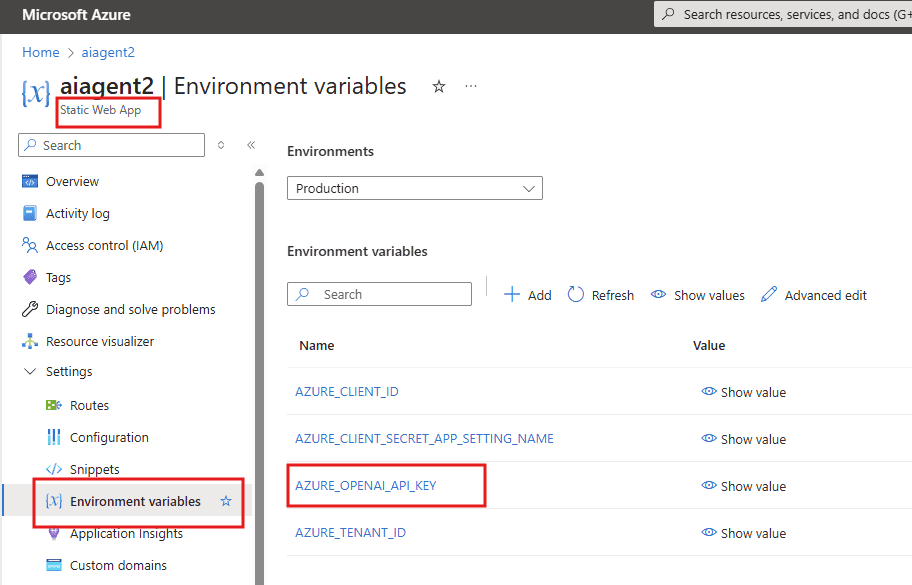
}This method requires you to store your AZURE_OPENAI_API_KEY in your environment variables. You can do this in your local.settings.json file and you can save it to your Environment Variables on the web app, see below for details.
The Chat Function Explained
Now let’s look at the main function that handles chat interactions. This function is the heart of our GPT chat application - it receives user messages, optionally processes uploaded files, and returns AI responses.
app.http('chatquery', {
    methods: ['POST'],
    authLevel: 'anonymous',
    handler: async (request, context) => {
        // Function implementation goes here
    }
});
What This Function Does
This Azure Function creates an HTTP endpoint called chatquery that:
- Accepts POST requests from your web application
- Handles two types of input: regular text messages and file uploads
- Maintains conversation history so the AI remembers previous messages
- Communicates with Azure AI Foundry to get intelligent responses
- Returns formatted responses back to your web app
Breaking Down the Function Step by Step
1. Input Handling - Understanding What the User Sent
const contentType = request.headers.get('content-type') || '';
let query, conversationId, uploadedText = '';

if (contentType.includes('multipart/form-data')) {
    // User uploaded a file along with their message
    const formData = await request.formData();
    query = formData.get('query');              // The user's question
    conversationId = formData.get('conversationId'); // Which conversation this belongs to
    const file = formData.get('file');          // The uploaded file
} else {
    // User just sent a text message
    const body = await request.json();
    query = body.query;
    conversationId = body.conversationId;
}
The function first checks if the user sent just a text message or included a file. Think of it like checking whether someone handed you a note or a note with documents attached.
2. File Processing - Reading Uploaded Documents
if (file && file.size > 0) {
    if (file.type === 'text/plain' || file.name.endsWith('.txt')) {
        uploadedText = await file.text(); // Read the file content
    } else {
        // For other file types, just note what was uploaded
        uploadedText = `[File uploaded: ${file.name}, Type: ${file.type}, Size: ${file.size} bytes]`;
    }
}
If someone uploaded a text file, the function reads its contents. For other file types, it just makes a note about what was uploaded. It’s like a secretary who can read text documents but acknowledges other types of files.
3. Conversation Memory - Keeping Track of the Chat
const convId = conversationId || `conv_${Date.now()}`;
let messages = conversationStore.get(convId) || [
    { role: "system", content: "You are a helpful assistant. Use uploaded file context if available." }
];
The function creates or retrieves the conversation history. Each conversation gets a unique ID, and if it’s a new conversation, it starts with instructions for the AI assistant.
4. Building the Context - Combining Message and File
let userContent = query;
if (uploadedText) {
    userContent += `\n\n[File Context]: ${uploadedText.substring(0, 2000)}...`;
}
messages.push({ role: "user", content: userContent });
The function combines the user’s question with any uploaded file content (limited to 2000 characters to avoid overwhelming the AI). It then adds this combined message to the conversation history.
5. Getting AI Response - Talking to Azure AI Foundry
const client = await initAzureOpenAI();
const response = await client.chat.completions.create({
    messages,
    max_completion_tokens: 1000,
    temperature: 0.7,
    model: deployment
});
This is where the magic happens! The function sends all the conversation messages to Azure AI Foundry and asks for a response. The settings control how creative (temperature) and how long (max_completion_tokens) the response can be.
6. Managing Memory - Keeping Conversations Manageable
const assistantMessage = response.choices[0].message.content;
messages.push({ role: "assistant", content: assistantMessage });

if (messages.length > 11) messages = [messages[0], ...messages.slice(-10)];
conversationStore.set(convId, messages);
The function saves the AI’s response to the conversation history. To prevent the conversation from getting too long (which would be expensive and slow), it keeps only the system message plus the last 10 exchanges.
7. Sending the Response Back
return {
    status: 200,
    headers: { 'Content-Type': 'application/json' },
    body: JSON.stringify({
        response: assistantMessage,
        conversationId: convId,
        success: true
    })
};
Finally, the function packages up the AI’s response along with the conversation ID and sends it back to your web application.
Error Handling
The entire function is wrapped in a try-catch block, so if anything goes wrong (network issues, file problems, AI service errors), it returns a helpful error message instead of crashing.
Summary of the Chat Design
- Flexible Input: Handles both simple text and file uploads
- Conversation Memory: Remembers context for natural conversations
- Resource Management: Limits conversation length to control costs
- Error Resilience: Gracefully handles problems
- Stateless: Each request is independent, making it scalable
This function essentially acts as a smart translator between your web interface and Azure AI Foundry, handling all the complexity of file processing, conversation management, and AI communication behind the scenes.